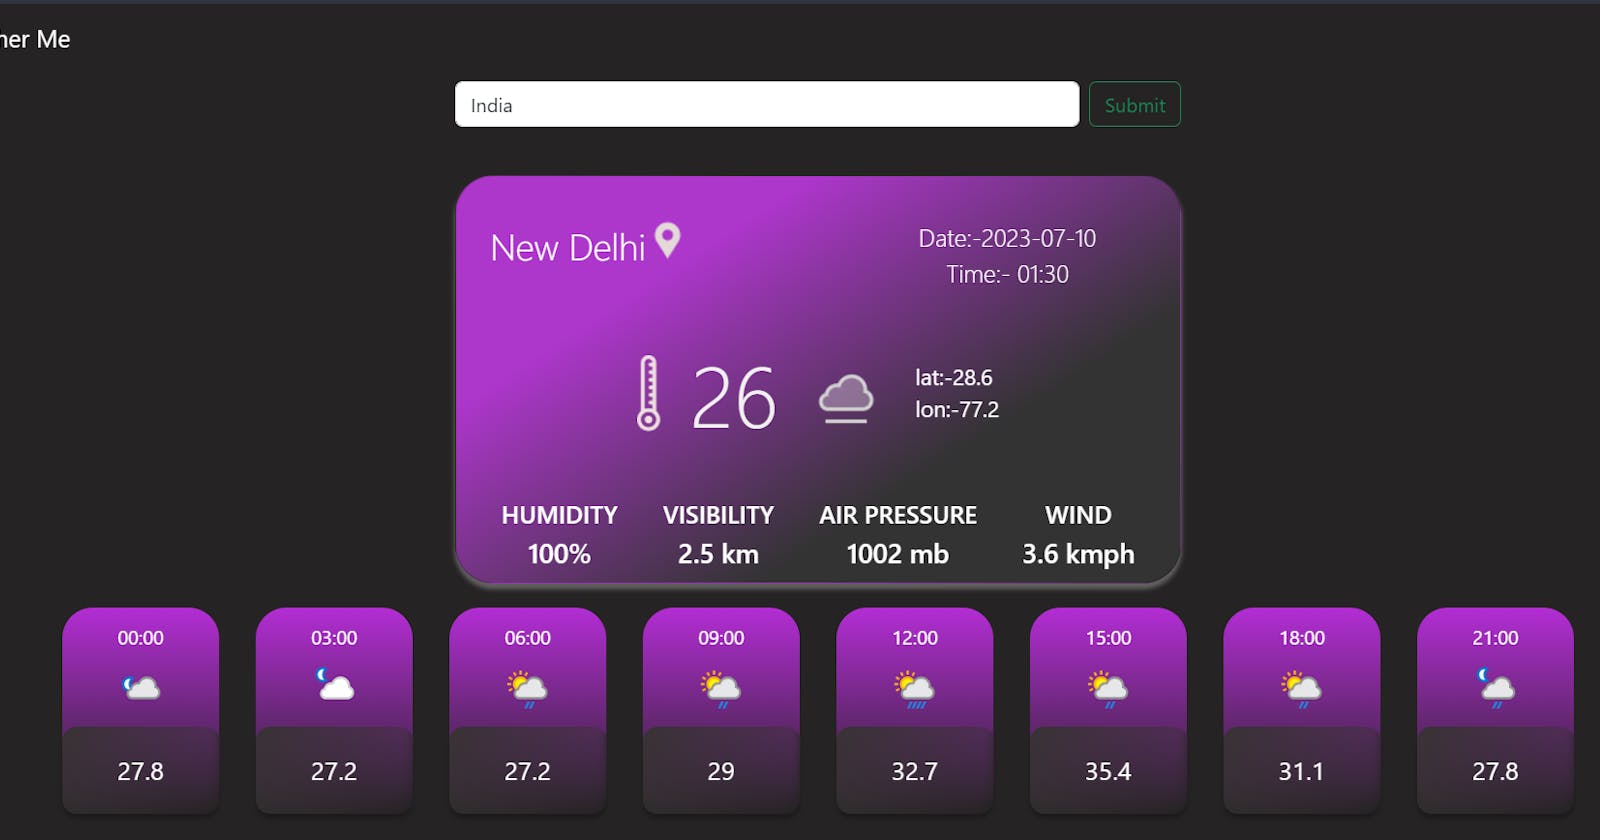


In this tutorial, we'll explore how to build a weather application using React. The application will fetch weather data from the WeatherAPI and display it in a user-friendly way.
The complete project is available on GitHub
Prerequisites
To follow along with this tutorial, make sure you have the following:
Basic knowledge of JavaScript and React.
An API key from WeatherAPI (signup required).
Setting Up the Project
- Start by creating a new React project. Open your terminal and run the following command:
npx create-react-app weather-app
- Once the project is created, navigate to the project folder:
cd weather-app
Setting Up the API
Next, we need to obtain an API key from WeatherAPI. Visit the WeatherAPI website and sign up for an account. Once you've signed up, you will receive an API key.
Now, create a new file in the root directory of your project called
.env. This file will store your API key as an environment variable. Open the.envfile and add the following line:
REACT_APP_API_KEY=your_api_key_here
Replace your_api_key_here with the API key, you obtained from the WeatherAPI.
Save the .env file. Note that it's essential to prefix the environment variable with REACT_APP_ to make it accessible in your React application.
- Replace the default code in
App.jswith the following code:
// Import necessary dependencies
import React, { useState } from 'react';
import './App.css';
import WeatherCard from './components/WeatherCard';
import HourWeather from './components/HourWeather';
import Navbar from './components/Navbar';

function App() {
  const [weatherData, setweatherData] = useState(null);
  const [location, setLocation] = useState('');
  const [error, setError] = useState('200');

  const handleSubmit = (event) => {
    event.preventDefault();
    location === ''
      ? setweatherData(null)
      : fetch(
          `https://api.weatherapi.com/v1/forecast.json?key=${process.env.REACT_APP_API_KEY}&q=${location}&days=1&aqi=no&alerts=no`
        )
          .then((response) => {
            if (response.ok) {
              return response.json();
            }
            return Promise.reject(response);
          })
          .then((weatherJsonData) => setweatherData(weatherJsonData))
          .catch((loggedError) => {
            setError(loggedError);
          });
  };

  return (
    <>
      <Navbar />
      <div className='customSearch p-2'>
        <form className='d-flex' onSubmit={handleSubmit}>
          <input
            className='form-control me-2'
            type='text'
            value={location}
            onChange={(e) => setLocation(e.target.value)}
            placeholder='Search'
            aria-label='Search'
          />
          <input className='btn btn-outline-success' type='submit' />
        </form>
      </div>

      {weatherData !== null ? (
        <div className='App'>
          <WeatherCard location={weatherData['location']} forecastCurrent={weatherData['current']} />
          <div className='box-hour-weather'>
            {weatherData['forecast'].forecastday[0].hour.map((hour, index) =>
              index % 3 === 0 ? <HourWeather key={hour.time_epoch} hourWeather={hour} /> : null
            )}
          </div>
        </div>
      ) : error.status === 400 ? (
        <div style={{ color: '#fff', display: 'flex', justifyContent: 'center', alignItems: 'center' }}>
          Some Error Occurred
        </div>
      ) : (
        <div style={{ color: '#fff', display: 'flex', justifyContent: 'center', alignItems: 'center' }}>
          No location selected
        </div>
      )}
    </>
  );
}

export default App;
- Replace the default code in
App.csswith the following code:
body{
  background: #252323;

}
.App {
  display: flex;
  flex-direction: column;
  justify-content: center;
  align-items: center;
  margin: 2rem;
  color: #FFF;
  gap: 20px;
}


.card {
  gap: 2rem;
  display: flex;
  flex-direction: column;
  width: 600px;
  height: fit-content;
  flex-shrink: 0;
  border-radius: 32px;
  background: linear-gradient(147deg, #AD36CB 26.56%, #333 68.75%);
  box-shadow: 0px 4px 4px 0px rgba(0, 0, 0, 0.25), 0px 4px 4px 0px rgba(255, 250, 250, 0.25), 0px 4px 4px 0px rgba(253, 245, 245, 0.25);
}

.location {
  display: flex;
  width: 50%;
  height: 36px;
  flex-shrink: 0;
  color: #FFF;
  font-size: 30px;
  font-weight: 300;
}

.tempDiv {
  height: fit-content;
  display: flex;
  justify-content: center;
  align-items: center;
  gap: 25px;

}

.temp {
  color: #F2F1F1;
  font-size: 70px;
  font-weight: 300;
}

.cardBottom {
  display: flex;
  height: 72px;
  justify-content: space-evenly;
}

.title,
.date {
  color: #FFF;
  text-align: center;

  font-size: 20px;
  font-weight: 500;
  text-transform: uppercase;
}

.value {
  color: #FFF;
  font-size: 22px;
  text-align: center;
  font-weight: 500;
}

.upperDiv {
  display: flex;
  width: 100%;
  padding: 35px 0 0 28px;

}

.date {
  width: 50%;
  text-transform: none;
  font-weight: 300;
}
.box-hour-weather{
  display: flex;
  flex-wrap: wrap;
  justify-content: center;
  gap: 30px;
}

.loc{
  color: #FFF;
  font-size: 18px;
}

.main-hour-weather {
  width: 130px;
  height: 100%;
  flex-shrink: 0;
  border-radius: 25px;
  background: linear-gradient(180deg, #B32DD4 0%, rgba(217, 217, 217, 0.00) 100%);
}

.hour-weather-value {
  display: flex;
  height: 50%;
  flex-direction: column;
  justify-content: center;
  align-items: center;
  padding: 12px;
  gap: 10px;
}

.tempShow {
  width: 100%;
  flex-shrink: 0;
  border-radius: 12px;
  background: linear-gradient(135deg, #373333 0%, rgba(55, 51, 51, 0.00) 100%);
  box-shadow: 0px 4px 4px 0px rgba(0, 0, 0, 0.25);
  backdrop-filter: blur(4px);

}
.hour-temp{
  height: 72px;
  display: flex;
  justify-content: center;
  align-items: center;
  font-size: 21px;
}
.customSearch{
  display: flex;
  justify-content: center;
  align-items: center;
}

/* Extra small devices (phones, 600px and down) */
@media only screen and (max-width: 600px) {
  .card{
    width: 300px;
  }
  .location{
    font-size: 20px;
  }
  .location img{
    height: 25px;
  }
  .date{
    font-size: 15px;
  }
  .title,.value{
    font-size: 10px;
  }
  .temp{
    font-size: 40px;
  }
  .loc{
    font-size: 10px;
  }
  .tempDiv img{
    height: 40px;
  }

}

/* Small devices (portrait tablets and large phones, 600px and up) */
/* @media only screen and (min-width: 600px) {...} */

/* Medium devices (landscape tablets, 768px and up) */
@media only screen and (min-width: 768px) {.customSearch form{
  width: 500px;
}}

/* Large devices (laptops/desktops, 992px and up) */
@media only screen and (min-width: 992px) {
  .customSearch form{
    width: 600px;
  }
- Create a new file called
HourWeather.jsinside thesrc/componentsfolder and add the following code:
import React from 'react';

const HourWeather = (props) => {
  return (
    <div className='main-hour-weather'>
      <div className='hour-weather-value'>
        <div className='hour-time'>{props.hourWeather.time.slice(10)}</div>
        <img className='hour-temp-img' height='40px' src={props.hourWeather.condition.icon} alt='weather condition' />
      </div>
      <div className='tempShow'>
        <div className='hour-temp'>{props.hourWeather.temp_c}</div>
      </div>
    </div>
  );
};

export default HourWeather;
- Create a new file called
Navbar.jsinside thesrc/componentsfolder and add the following code:
import React from 'react';
import logo from './logo.png';

const Navbar = () => {
  return (
    <nav className='navbar bg-body-dark'>
      <div className='container-fluid'>
        <a className='navbar-brand' style={{ color: '#fff' }} href='/'>
          <img src={logo} alt='Logo' width='30' height='24' className='d-inline-block align-text-top' />
          Weather Me
        </a>
      </div>
    </nav>
  );
};

export default Navbar;
- Create a new file called
WeatherCard.jsinside thesrc/componentsfolder and add the following code:
import React from 'react';
import '../App.css';
import locationIcon from './icon_location.png';
import tempIcon from './icon_temperature.png';

const WeatherCard = (props) => {
  return (
    <div className='card'>
      <div className='upperDiv'>
        <div className='location'>
          {props.location.name}
          <img src={locationIcon} alt='location' />
        </div>
        <div className='date'>
          Date:-
          {props.forecastCurrent.last_updated.slice(0, 10)}
          <br />
          Time:-
          {props.forecastCurrent.last_updated.slice(10)}
        </div>
      </div>

      <div className='lowerdiv'>
        <div className='tempDiv'>
          <img src={tempIcon} alt='temperature Icon' />
          <span className='temp'>{props.forecastCurrent.temp_c}</span>
          <img src={props.forecastCurrent.condition.icon} alt='weather Condition' />
          <div className='loc'>
            lat:-{props.location.lat}
            <br />
            lon:-{props.location.lon}
          </div>
        </div>
      </div>
      <div className='cardBottom'>
        <div className='humid'>
          <div className='title'>Humidity</div>
          <div className='value'>{props.forecastCurrent.humidity}%</div>
        </div>
        <div className='visibile'>
          <div className='title'>Visibility</div>
          <div className='value'>{props.forecastCurrent.vis_km} km</div>
        </div>
        <div className='airPressure'>
          <div className='title'>Air pressure</div>
          <div className='value'>{props.forecastCurrent.pressure_mb} mb</div>
        </div>
        <div className='wind'>
          <div className='title'>Wind</div>
          <div className='value'>{props.forecastCurrent.wind_kph} kmph</div>
        </div>
      </div>
    </div>
  );
};

export default WeatherCard;
Conclusion
In this tutorial, we created a weather application using React. The application fetches weather data from the WeatherAPI and displays it in a user-friendly manner. We utilized React components, hooks, and external API integration to achieve this functionality. Feel free to explore and enhance this project further by adding more features or customizing the UI.
Happy coding!